本文最后更新于 1692 天前,其中的信息可能已经有所发展或是发生改变。
演示站点
哪吒探针搭建教程
得到GitHub账号ID
浏览器中打开https://api.github.com/users/你的GitHub用户名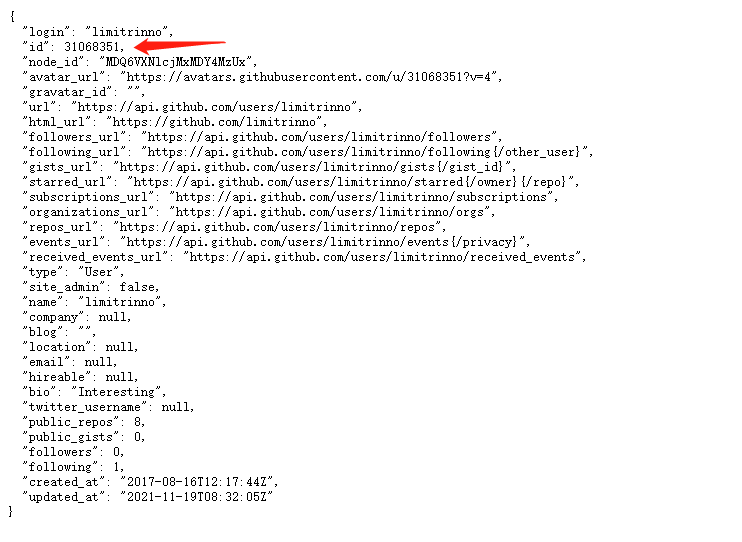
创建一个OAuth Apps
先打开:https://github.com/settings/developers,然后点击New OAuth App按钮

http://你的域名:8008
http://你的域名:8008/oauth2/callback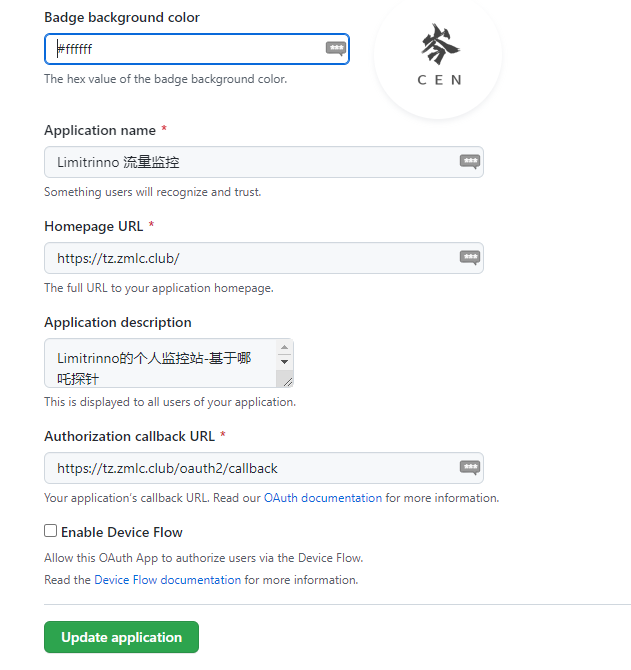
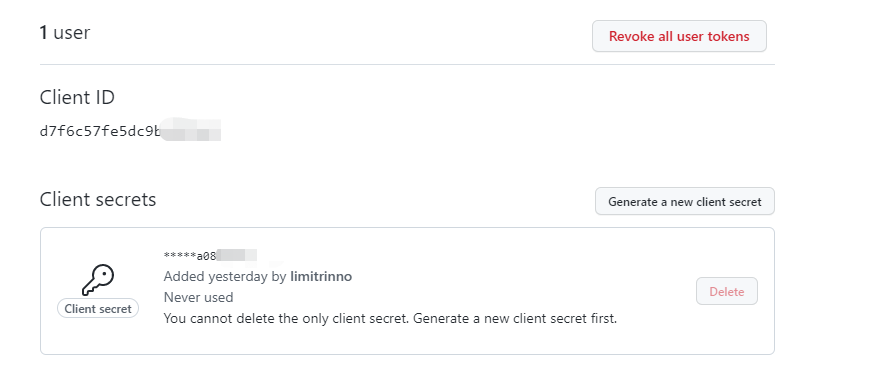
OAuth Apps的Client ID和Client secrets
放行防火墙
8008和5555两个端口安装命令
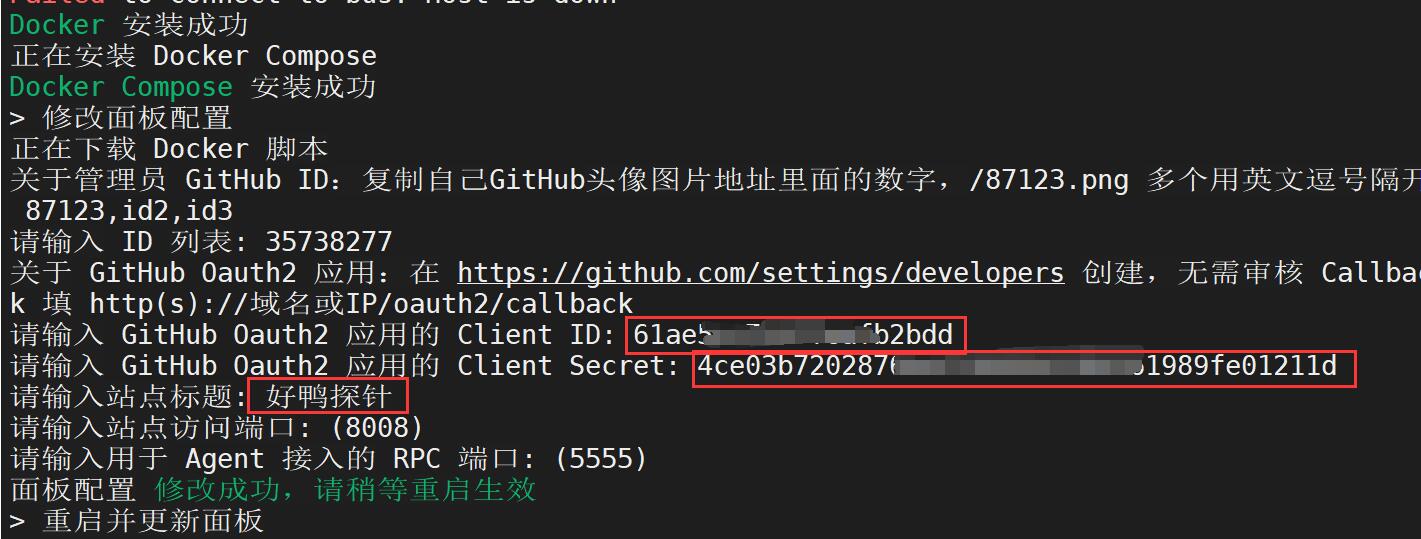
哪吒面板开发者提供了一键脚本
curl -L https://raw.githubusercontent.com/naiba/nezha/master/script/install.sh -o nezha.sh && chmod +x nezha.sh && sudo ./nezha.sh国内机器
curl -L https://jihulab.com/nezha/nezha/-/raw/master/script/install.sh -o nezha.sh && chmod +x nezha.sh && sudo CN=true ./nezha.sh输入1回车
接着就要输入前面记录下来的GitHub账号ID、OAuth Apps的Client ID、OAuth Apps的Client secrets了
全站反代理 + CDN套用 (nginx)
Nginx 配置
- 不需要SSL自行去除
- 配置主站反代,ws反代
- 如果需要用到terminal功能,把nginx的terminal1修改成terminal
# Nezha dashboard
server {
        listen       80;
        listen       443 ssl;
        server_name  tz.domain.com;
        root         /www/tz;
        ssl_certificate  /www/**/**.crt;
        ssl_certificate_key /www/**/**.key;
        ssl_session_cache shared:SSL:1m;
        ssl_session_timeout 5m;
        ssl_ciphers HIGH:!aNULL:!MD5;
        ssl_prefer_server_ciphers on;
location / {
    proxy_pass http://127.0.0.1:8008;
    proxy_set_header Host $http_host;
    proxy_set_header      Upgrade $http_upgrade;
}
location ~ ^/(ws|terminal1/.+)$  {
    proxy_pass http://127.0.0.1:8008;
    proxy_http_version 1.1;
    proxy_set_header Upgrade $http_upgrade;
    proxy_set_header Connection "Upgrade";
    proxy_set_header Host $http_host;
}
重启Nginx服务器后即可访问
反向代理 gRPC 端口
# Nezha GRPC 注意与http块同级
upstream grpcservers {
    server localhost:5555;
    keepalive 1024;
}

server {
        listen       443 ssl http2;
        server_name  tz1.zmlc.club;
        root         /www/tz1;
        ssl_certificate  /www/tz1/ssl/tz1.crt;
        ssl_certificate_key /www/tz1/ssl/tz1.key;
        underscores_in_headers on;
    location / {
        grpc_read_timeout 300s;
        grpc_send_timeout 300s;
        grpc_socket_keepalive on;
        grpc_pass grpc://grpcservers;
    }
}
重启Nginx服务器
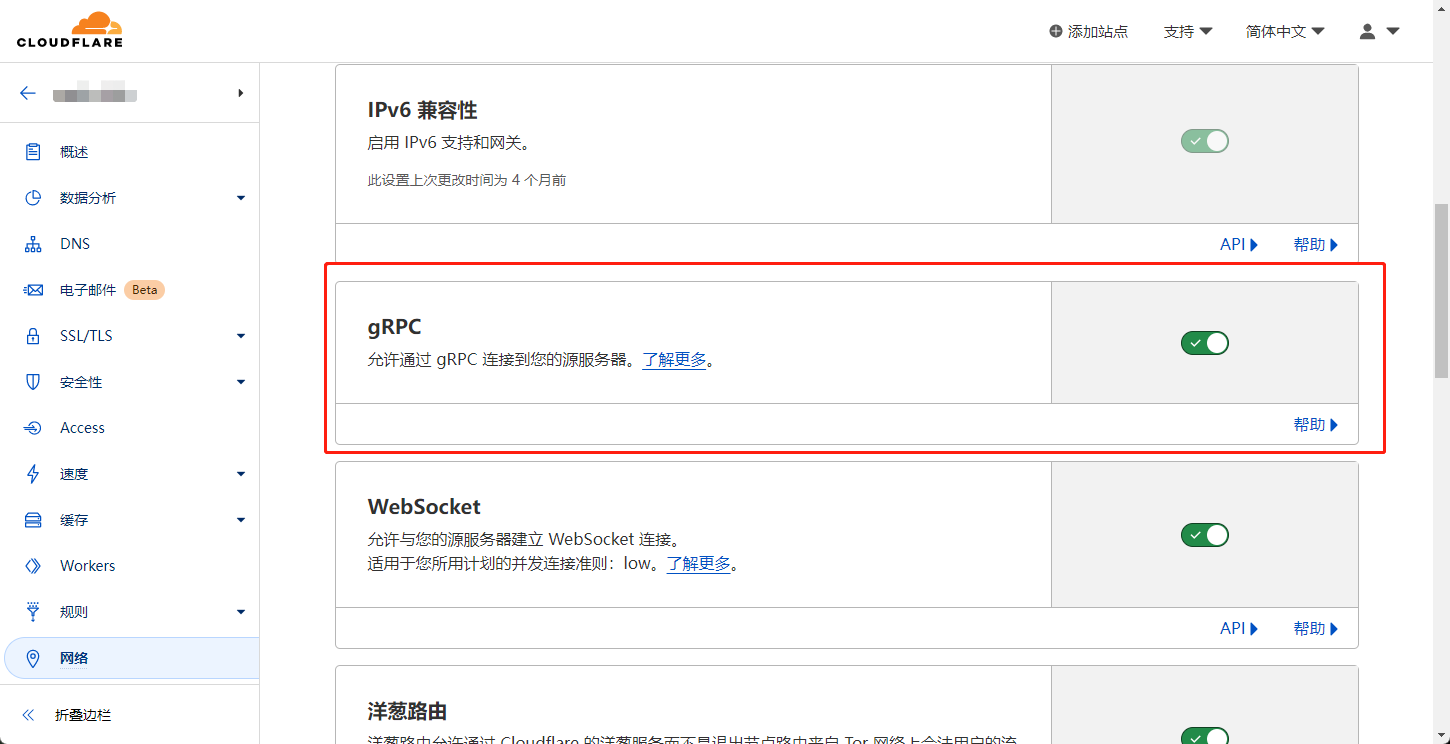
打开Cloudflare面板,找到域名-网络-开启grpc
打开面板设置
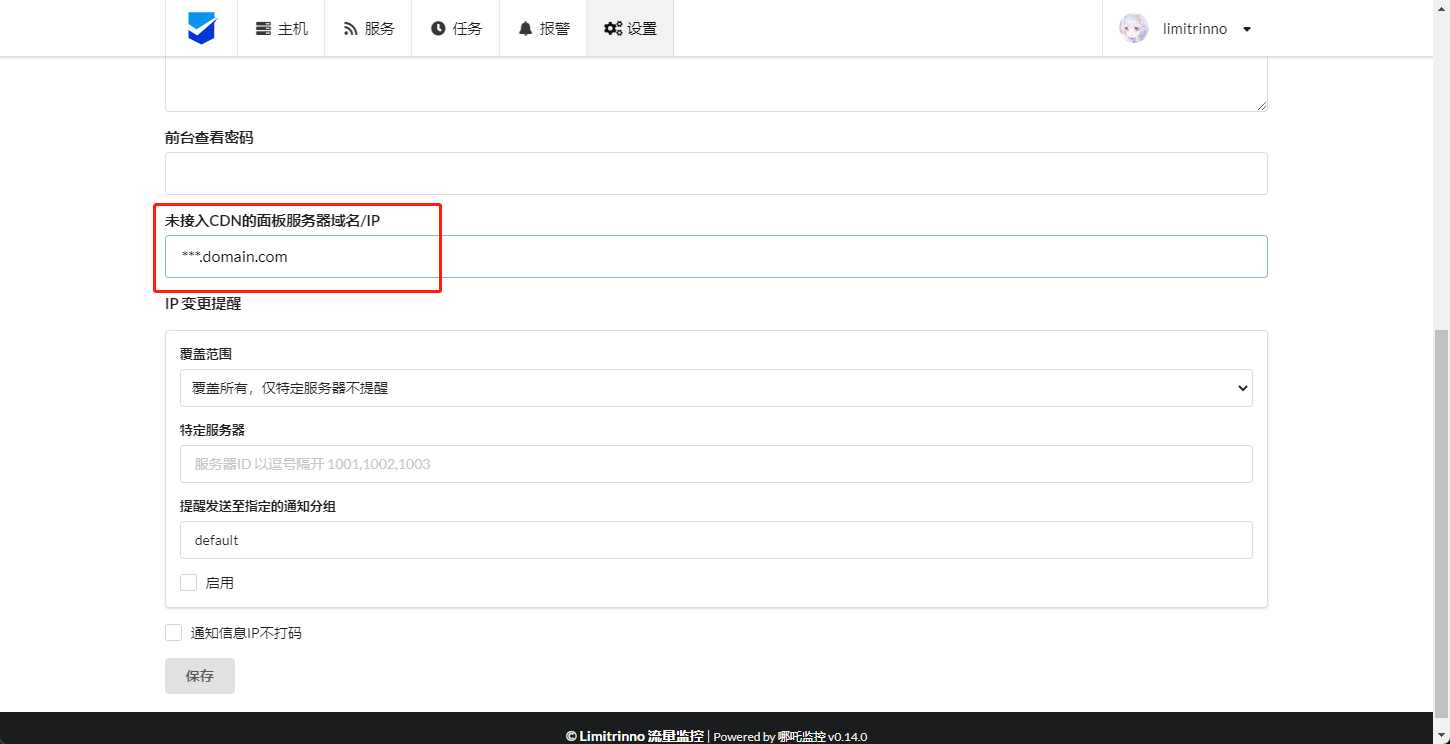
首先登录面板进入管理后台 打开设置页面,在 未接入CDN的面板服务器域名/IP 中填入上一步在 Nginx 或 Caddy 中配置的域名 比如 data.example.com ,并保存。
自己新增一个域名,***.domain.com
填写好保存,进入 /opt/nezha/dashboard/data/config.yaml这个文件
proxygrpcport 修改为 443
tls 设置为 true
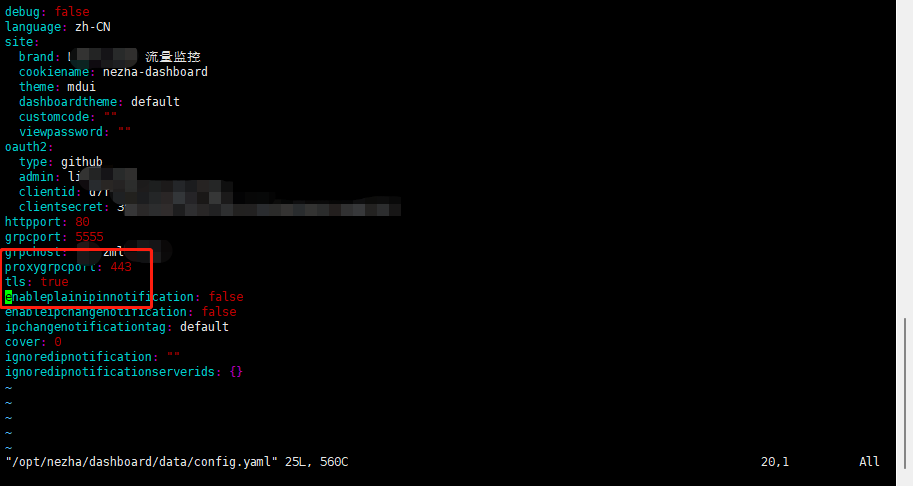
修改完成后重启面板。

cloudflare cdn 开启
把 ***.domain.com 的域名开启CDN
openwrt 安装agent
首先在 release 下载对应的二进制解压 zip 包后放置到 /mnt/nezha
运行 chmod +x /mnt/nezha/nezha-agent 赋予执行权限,然后创建 /etc/init.d/nezha-service
#!/bin/sh /etc/rc.common

START=99
USE_PROCD=1

start_service() {
 procd_open_instance
 procd_set_param command /mnt/nezha/nezha-agent -s 面板通信地址:端口 -p 秘钥 -d --tls
 procd_set_param respawn
 procd_close_instance
}

stop_service() {
    killall nezha-agent
}

restart() {
 stop
 sleep 2
 start
}
运行 chmod +x /etc/init.d/nezha-service 赋予执行权限
启动服务: /etc/init.d/nezha-service enable && /etc/init.d/nezha-service start
Windows 安装
下载上述文件之后,按照下图填写

nssm install <servername>
如:nssm install nezha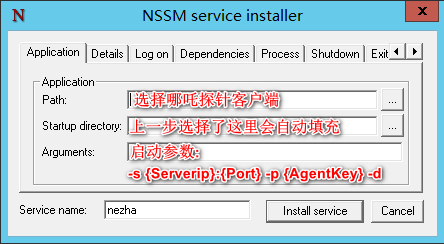
启动参数格式为:
-s {Serverip}:{Port} -p {AgentKey} -d-s 43.132.193.125:5555 -p 6e17ba77f8e876db71 -d修改页面
使用docker cp命令将容器内的静态资源复制到宿主机
docker cp dashboard_dashboard_1:/dashboard/resource/ ~/nezha_resource/ && cd ~/nezha_resource/此时~/nezha_resource/目录下有两个文件夹:static、template
2. 修改Logo
就在~/nezha_resource/static/logo.png,用你喜欢的图片替换它
3.修改footer页脚
4. 使用docker cp命令将修改好的文件复制回容器内
和复制出来的命令是差不多的
docker cp ~/nezha_resource/static/ dashboard_dashboard_1:/dashboard/resource/
docker cp ~/nezha_resource/template/ dashboard_dashboard_1:/dashboard/resource/
5.反代、SSL、CDN
反代配置
location /
{
    proxy_pass http://127.0.0.1:8008;
    proxy_set_header Host $host;
}
location /ws
{
    proxy_pass http://127.0.0.1:8008;
    proxy_http_version 1.1;
    proxy_set_header Upgrade $http_upgrade;
    proxy_set_header Connection "Upgrade";
    proxy_set_header Host $host;
}
location /terminal
{
    proxy_pass http://127.0.0.1:8008;
    proxy_http_version 1.1;
    proxy_set_header Upgrade $http_upgrade;
    proxy_set_header Connection "Upgrade";
    proxy_set_header Host $host;
}