本文最后更新于 1581 天前,其中的信息可能已经有所发展或是发生改变。
系统环境
- Ubuntu 20.04
- 2H4G50G

修改网卡的IP
sudo vi /etc/netplan/00-installer-config.yamlnetwork:
ethernets:
ens33:
dhcp4: no
addresses: [192.168.31.211/24]
optional: true
gateway4: 192.168.31.253
nameservers:
addresses: [192.168.31.253]
version: 2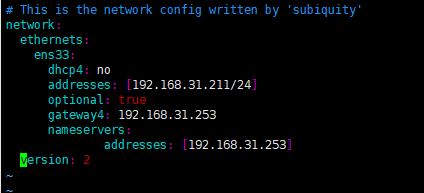
更新系统和软件
sudo apt-get -y update
sudo apt-get -y upgrade
下载Zabbix-Nginx安装包
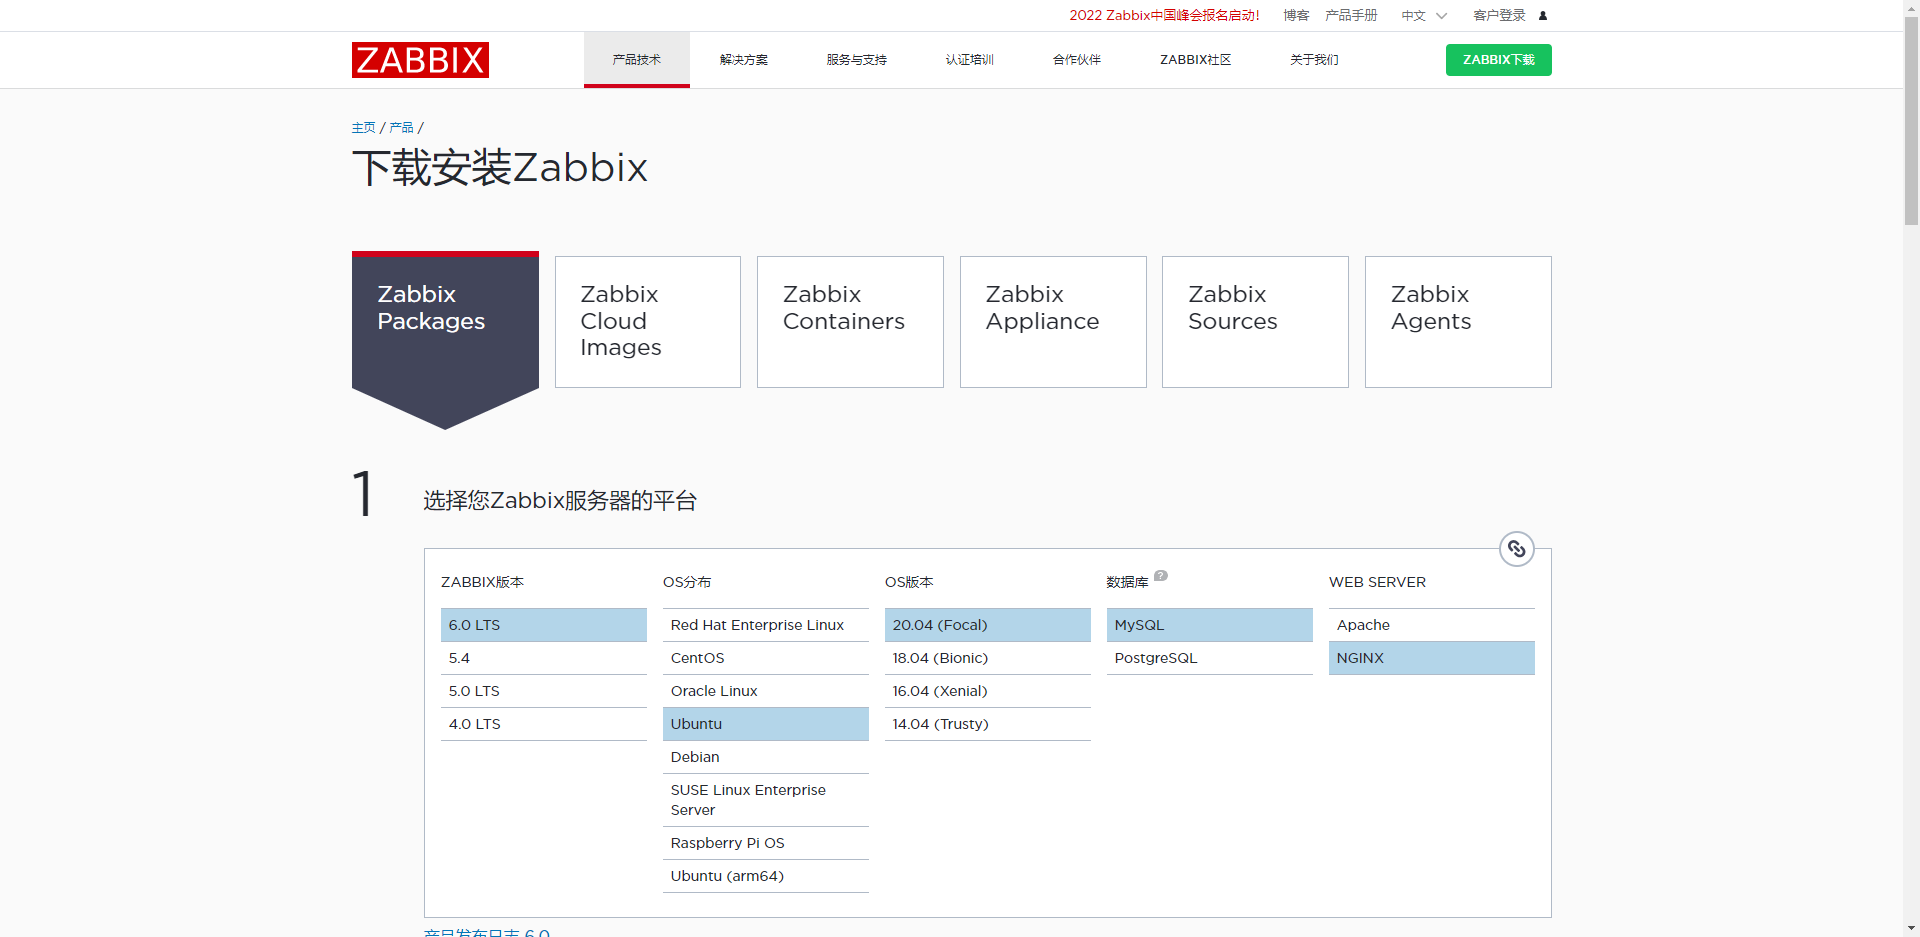
- https://www.zabbix.com/cn/download
- Zabbix Packages - ZABBIX版本 6.0 LTS - OS版本 Ubuntu - OS版本 20.04(focal) - MySQL - Nginx
安装ZABBIX-repo库
sudo wget https://repo.zabbix.com/zabbix/6.0/ubuntu/pool/main/z/zabbix-release/zabbix-release_6.0-1+ubuntu20.04_all.deb
sudo dpkg -i zabbix-release_6.0-1+ubuntu20.04_all.deb
sudo apt update
安装Zabbix server,Web 前端,Agent ,Mysql server
sudo apt -y install zabbix-server-mysql zabbix-frontend-php zabbix-nginx-conf zabbix-sql-scripts zabbix-agent mysql-server初始化数据库
sudo mysql_secure_installationSecuring the MySQL server deployment.
Connecting to MySQL using a blank password.
The 'validate_password' component is installed on the server.
The subsequent steps will run with the existing configuration
of the component.
Please set the password for root here.
New password: [输入你的mysql密码]
Re-enter new password: [再一次输入你的mysql密码]
Estimated strength of the password: 25
Do you wish to continue with the password provided?(Press y|Y for Yes, any other key for No) : y
[您希望使用提供的密码继续吗?(按 y|Y 表示是,任何其他键表示否):y]
Remove anonymous users? (Press y|Y for Yes, any other key for No) : n
[移除匿名用户? (按 y|Y 表示是,任何其他键表示否):n]
Disallow root login remotely? (Press y|Y for Yes, any other key for No) : n
[远程禁止root登录? (按 y|Y 表示是,任何其他键表示否):n]
Remove test database and access to it? (Press y|Y for Yes, any other key for No) : n
[删除测试数据库并访问它? (按 y|Y 表示是,任何其他键表示否):n]
Reload privilege tables now? (Press y|Y for Yes, any other key for No) : y
[现在重新加载权限表? (按 y|Y 表示是,任何其他键表示否):y]
Success.
All done! 数据库运行这个代码
- sudo mysql -uroot -p
set global validate_password.policy=0;
set global validate_password.length=1;
create database zabbix character set utf8mb4 collate utf8mb4_bin;
create user zabbix@localhost identified by 'password';
grant all privileges on zabbix.* to zabbix@localhost;
quit;
导入zabbix数据库
sudo zcat /usr/share/doc/zabbix-sql-scripts/mysql/server.sql.gz | mysql -uzabbix -p zabbixtips:这个过程会很久,稍微等一下。
配置zabbix server的数据库
- sudo vim /etc/zabbix/zabbix_server.conf
第129行
DBPassword=password
为Zabbix前端配置PHP
- sudo vim /etc/zabbix/nginx.conf
- 取消注释并且修改server_name
listen 80;
server_name 192.168.31.211;
设置zabbix server和agent进程
sudo systemctl restart zabbix-server zabbix-agent nginx php7.4-fpm mysql
sudo systemctl enable zabbix-server zabbix-agent nginx php7.4-fpm mysql
访问zabbix
http://192.168.31.211Congratulations! You have successfully installed Zabbix frontend.默认账户密码
Admin
zabbix
Centos 7 添加Agent主机
- 客户端Centos7.9
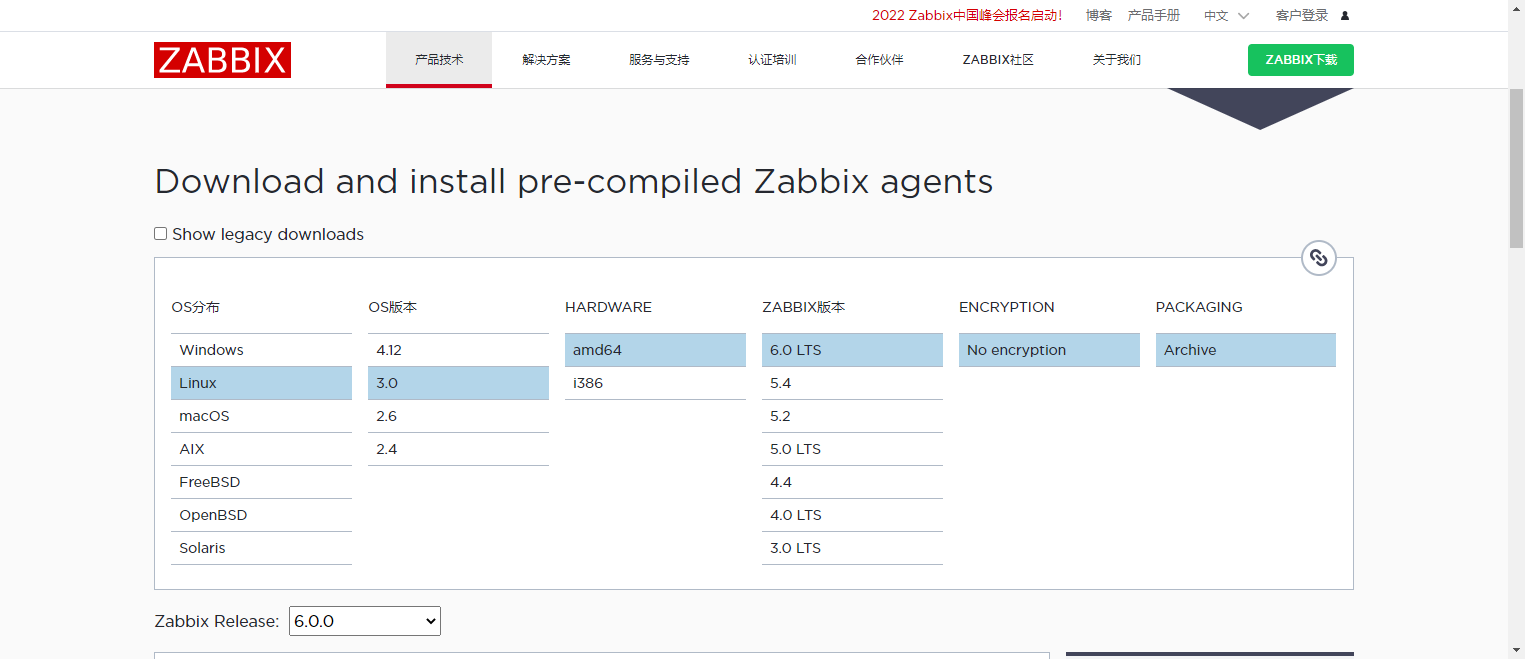
- https://www.zabbix.com/cn/download_agents
- Linux - 3.0 -amd64 - 6.0LTS
查看主机信息
[root@node5 ~]# cat /etc/redhat-release && uname -r && hostname && cat /etc/hostname
CentOS Linux release 7.9.2009 (Core)
3.10.0-1160.59.1.el7.x86_64
node5
node5
[root@node5 ~]# yum -y install net-tools
软件包 net-tools-2.0-0.25.20131004git.el7.x86_64 已安装并且是最新版本
无须任何处理
[root@node5 ~]# ifconfig ens33 |grep netmask |awk '{print $2}'
192.168.31.205被监控主机安装Agent:
wget https://cdn.zabbix.com/zabbix/binaries/stable/6.0/6.0.0/zabbix_agent-6.0.0-linux-3.0-amd64-static.tar.gz
mkdir -p /root/zabbix_agent
tar -zxvf zabbix_agent-6.0.0-linux-3.0-amd64-static.tar.gz -C /root/zabbix_agent
adduser zabbix -s /sbin/nologin
cd /root/zabbix_agent
cp bin/* /usr/bin/
cp sbin/* /usr/sbin
chmod a+x /usr/bin/zabbix_*
chmod a+x /usr/sbin/zabbix_*
mkdir -p /opt/zabbix/
cp conf/zabbix_agentd.conf /opt/zabbix/
修改zabbix serer的IP 192.168.31.211
sed -i "s/Server=127.0.0.1/Server=192.168.31.211/g" /opt/zabbix/zabbix_agentd.conf 修改ServerActive的IP 192.168.31.211
sed -i "s/ServerActive=127.0.0.1/ServerActive=192.168.31.211/g" /opt/zabbix/zabbix_agentd.conf 修改Hostname为本地hostname node5
sed -i "s/Hostname=Zabbix server/Hostname=node5/g" /opt/zabbix/zabbix_agentd.conf 启动Agent进程
/sbin/zabbix_agentd -c /opt/zabbix/zabbix_agentd.conf[root@node5 ~]# netstat -anlp | grep 10050
tcp 0 0 0.0.0.0:10050 0.0.0.0:* LISTEN 1486/zabbix_agentd 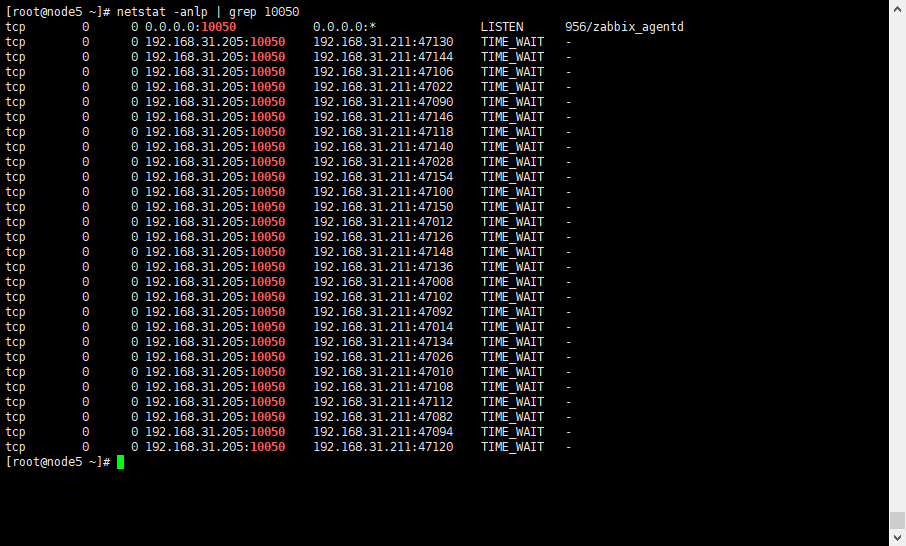
开机自启
chmod a+x /etc/rc.d/rc.local
vi /etc/rc.d/rc.local
/sbin/zabbix_agentd -c /opt/zabbix/zabbix_agentd.conf
停止进程
yum -y install psmisc
killall zabbix_agentd
Zabbix Server 添加主机监控信息
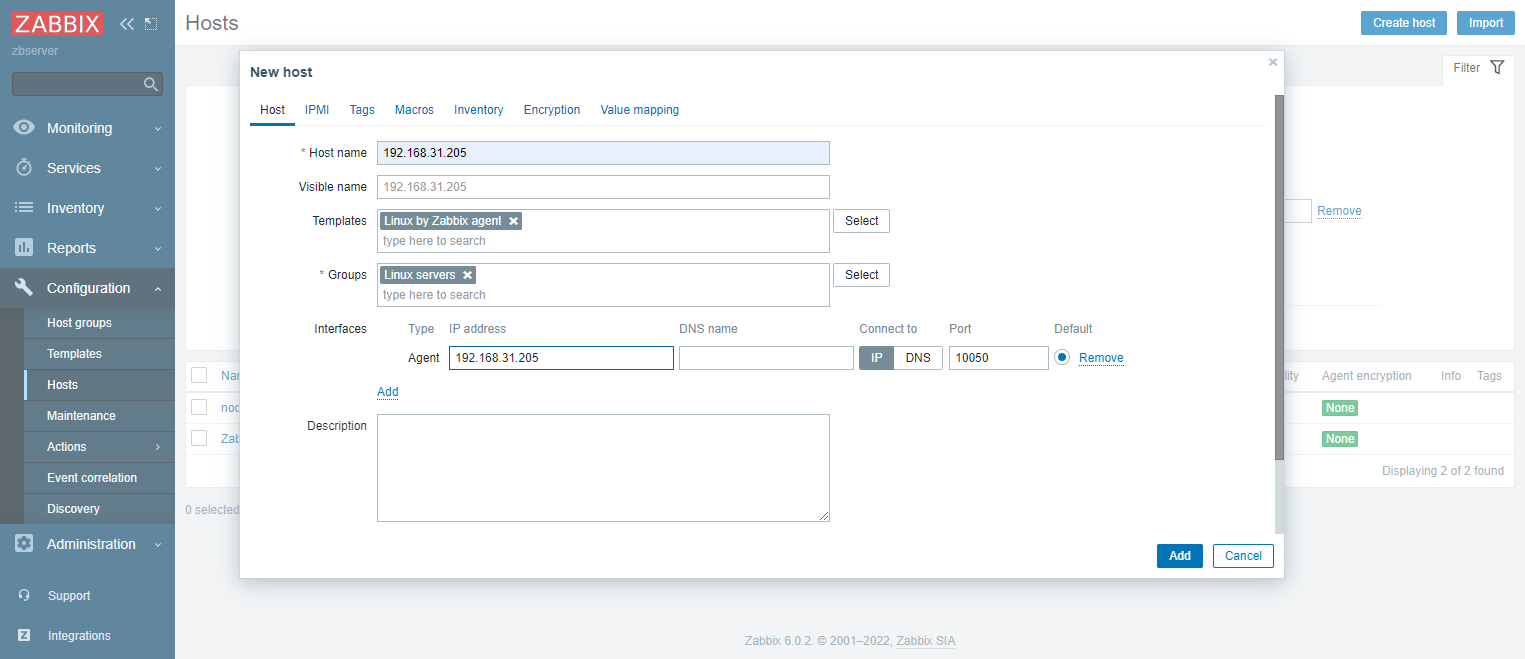
- Configuration - Hosts - create host
- hostname : node5
- Templates : Linux by zabbix agent
- Groups : Linux Server
- Interfaces - Agent : 192.168.31.205 Port:10050
- add
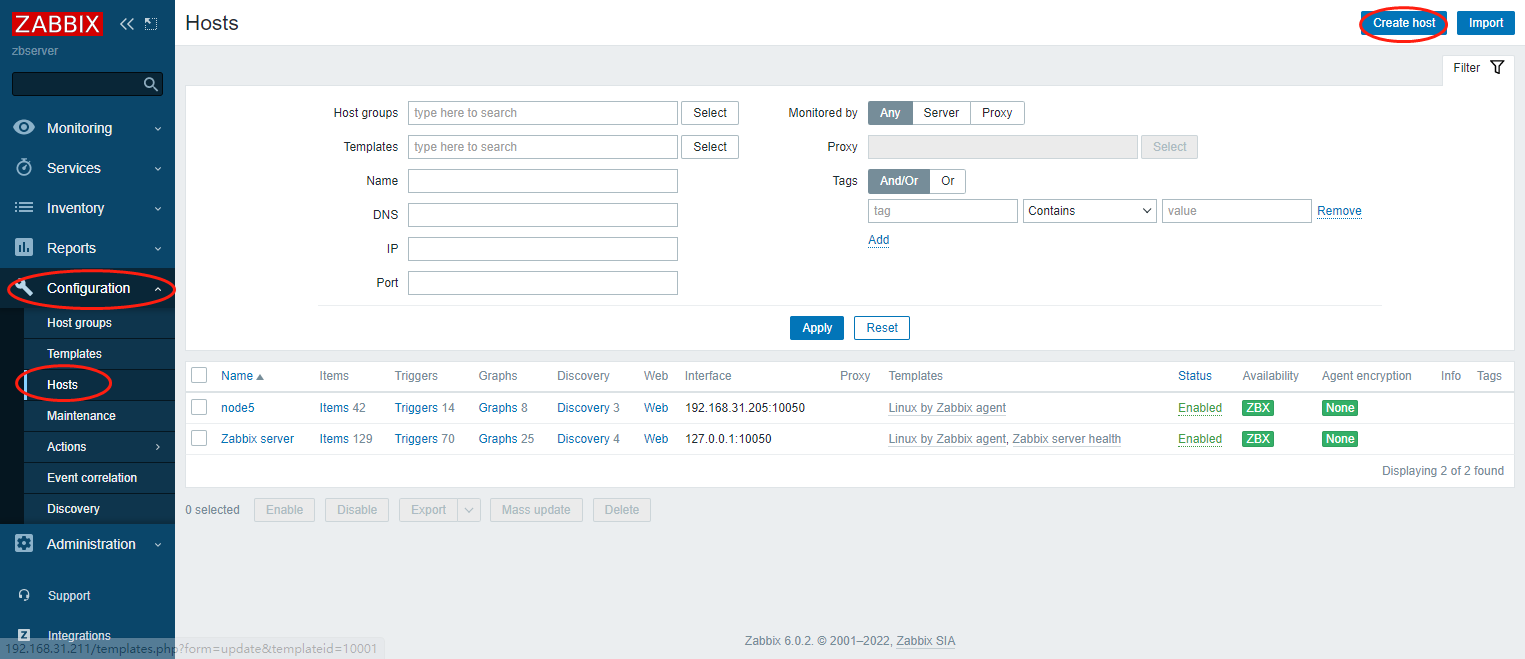
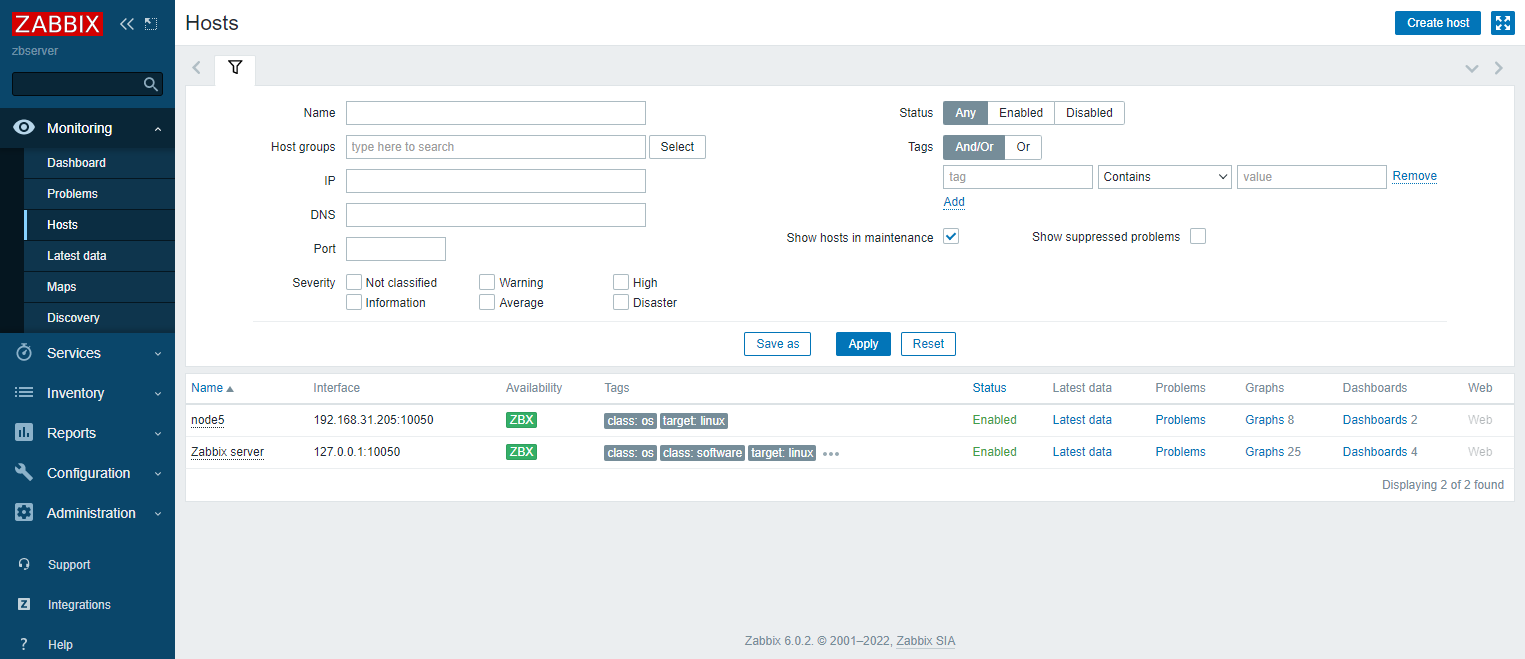
稍等片刻 - 主机上线

求一键脚本 啦啦啦啦
已经很懒了,都不想写了?
一键脚本胎死腹中了吗
等我看看啥时候想敲了再说? 其实文章已经写的听明白的啦